
How to Register for eTravel Philippines (2025 Complete Guide with Images)
Contents
- 1 🇵🇭 How to Register for eTravel Philippines (2025 Complete Guide with Images)
- 1.1 🖥️ Step-by-Step Registration Guide
- 1.2 🟩 STEP 2: Create an Account
- 1.3 🚨 Important Notes
- 1.4 🟩 STEP 3: Enter Personal Information
- 1.5 🟩STEP 3.5: Permanent Country of Residence Registration
- 1.6 🏡 Permanent Address Entry
- 1.7 📄 Onboarding Summary
- 1.8 🟩 STEP 4: Enter Travel Details
- 1.9 🟩 STEP 5: Complete Health Declaration
- 2 🟩 STEP 6: Philippine Customs Declaration
- 3 🟩 STEP 6.5: Other Travel Details
- 4 🟩 STEP 6.6: Declaration Signature
- 5 🟩 STEP 6.7: Family Member(s) Declaration Registration
- 6 🟩 STEP 7: Review & Submit
- 7
- 8 🟩 STEP 8: QR Code Issuance & Completion
- 8.1 📌 Important Reminders
- 8.2 🟦 Frequently Asked Questions (FAQ)
- 8.2.1 ❓ Do I need to register for eTravel even if I’m only transiting through the Philippines?
- 8.2.2 ❓ How soon can I register before my flight?
- 8.2.3 ❓ Is the eTravel registration free?
- 8.2.4 ❓ I’m traveling with my children. Do they need a separate registration?
- 8.2.5 ❓ What if I lose my QR code?
- 8.2.6 ❓ Can I update my information after submission?
- 8.2.7 ❓ What if I experience symptoms (fever, cough) before my flight?
- 8.2.8 ❓ Do I still need to fill out a customs form at the airport?
- 8.2.9 ❓ I made a mistake in my flight number or address. What should I do?
- 8.2.10 ❓ Is internet access required to show the QR code at the airport?
- 8.3 🟩 Summary: What You Need to Remember
🇵🇭 How to Register for eTravel Philippines (2025 Complete Guide with Images)
✈️ If you’re traveling to the Philippines in 2025, eTravel registration is no longer optional—it’s mandatory.
Whether you’re a tourist, returning resident, or overseas worker, all travelers arriving in or departing from the Philippines are required to register online through the official eTravel system before their flight. This digital platform has replaced both the One Health Pass and eArrival Card, streamlining health declarations and immigration requirements into one simple online form.
But there’s one thing many travelers don’t realize until it’s too late…
⚠️ There are fake eTravel websites out there designed to scam users or steal sensitive information.
These fake sites often look legitimate but may ask for payment or misuse your personal data.
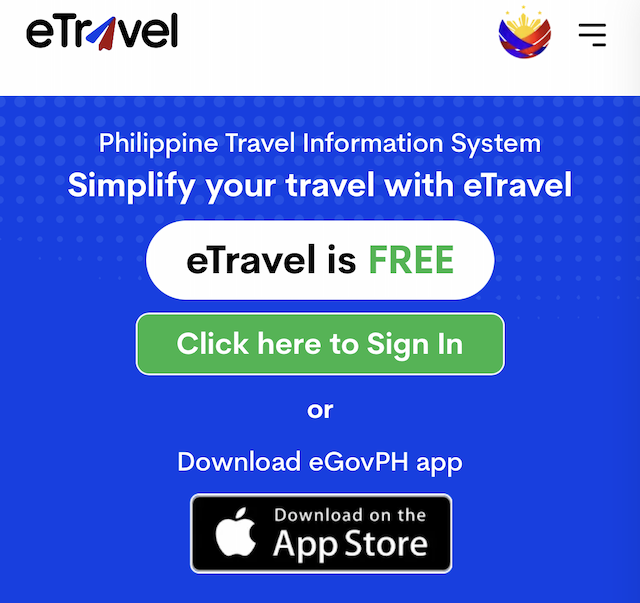
Remember: eTravel registration is 100% FREE, and the only official website is: https://etravel.gov.ph
If you accidentally register through a fraudulent site, you may face serious delays at the airport—or even be denied boarding.
🧭 In this updated 2025 guide, we’ll walk you through:
-
How to safely access the official eTravel site
-
Step-by-step registration instructions (with screenshots)
-
What documents you need and when to register
-
How to complete the health declaration and get your QR Code
-
Common mistakes to avoid and FAQ for first-time users
Whether you’re traveling for vacation, business, or family matters, this guide is designed to make your eTravel registration quick, secure, and stress-free.
Let’s get started 👇
🖥️ Step-by-Step Registration Guide
STEP 1: Visit the Official Website
Go to 👉 https://etravel.gov.ph
Click “Sign In” or “Create an Account”.
🟩 STEP 2: Create an Account
If this is your first time using the eTravel system, you need to create a personal account to proceed with the registration. Here’s how to do it safely and correctly:
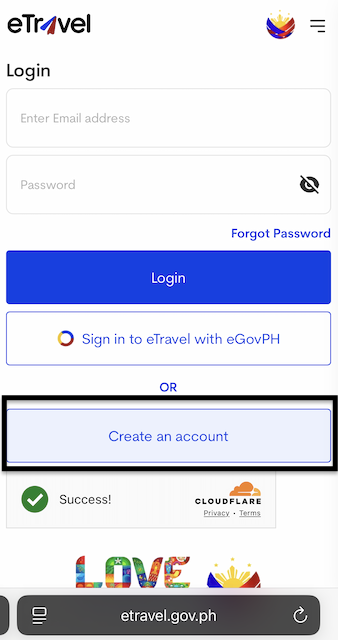
✅ 1. Click on “Create an Account”
Once you land on the official website, click the “Create an Account” button located below the login form on the homepage.
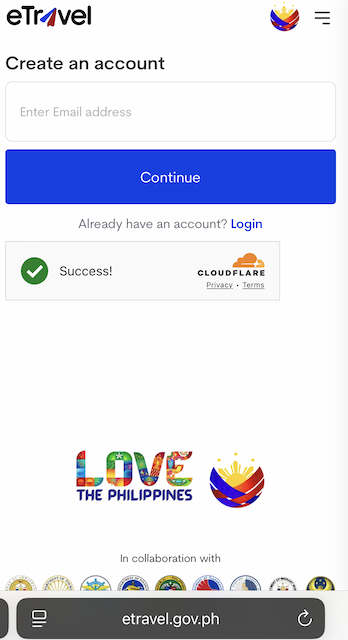
✅ 2. Enter Your Email Address
You’ll be asked to enter a valid and accessible email address.
Make sure it’s one you can open right away because a One-Time Password (OTP) will be sent there within seconds.
⚠️ Avoid using work or restricted email domains that might block OTP messages.
✅ 3. Check Your Inbox for the OTP
Go to your email inbox (or spam/junk folder if you don’t see it right away).
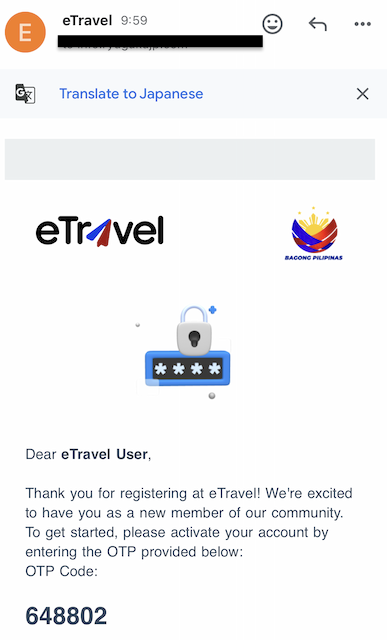
Look for a message titled “Your eTravel OTP Code”. This email contains a 6-digit number.
Return to the registration screen and enter this OTP code in the field provided.
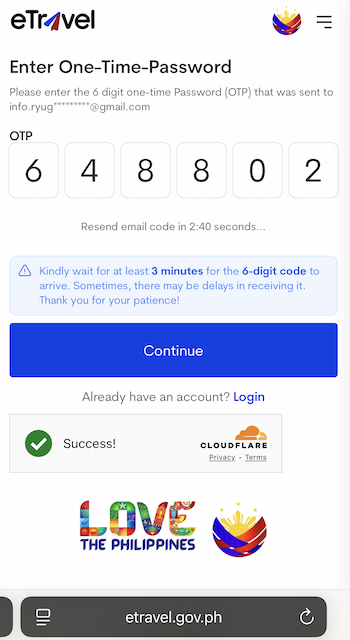
💡 The OTP is only valid for a short time, so make sure to enter it quickly.
✅ 4. Set Your Password
Once your email is verified, you’ll be prompted to create a secure password for your eTravel account.
Choose a password that meets the following criteria:
-
At least 8 characters
-
Includes uppercase + lowercase letters
-
At least 1 number
-
Optional: Symbols for extra strength (e.g.,
!,@,#)
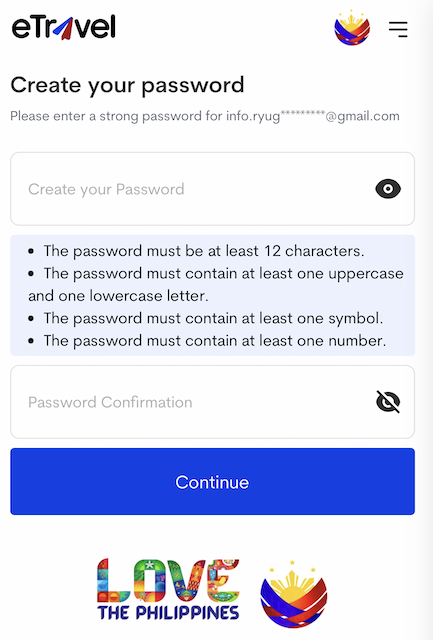
🔒 Pro Tip: Use a password manager if you tend to forget passwords.
✅ 5. Account Successfully Created!
After setting your password, you’ll receive a confirmation message and be redirected to your dashboard. From here, you can begin your travel registration process.
🚨 Important Notes
-
✅ One account per traveler is required (even for children or family members).
-
❌ Do not use third-party sites or agents to create your account—scam risk is high.
-
💡 Once your account is created, you can use it again for future trips.
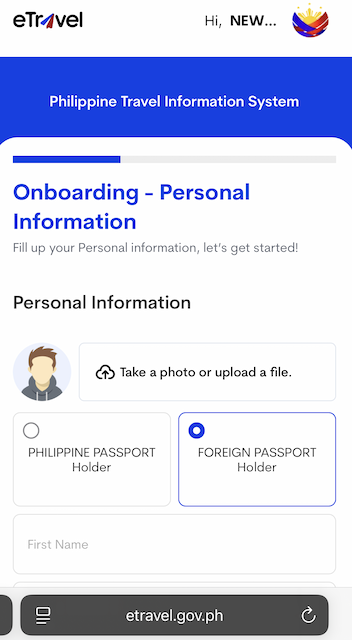
🟩 STEP 3: Enter Personal Information
Once your account is created and you’ve successfully logged in, the next step is to fill out your personal details. This information must match exactly with your passport and other travel documents.
✍️ Any mismatch could result in delays at immigration or airport check-in, so take your time and double-check each field.
✅ 1. Full Name
Enter your first name, middle name (if applicable), and last name, exactly as it appears on your passport.
-
Example:
Passport Name: Maria Angelica Cruz Lopez
→ First Name: Maria Angelica
→ Middle Name: Cruz
→ Last Name: Lopez
⚠️ Do not use nicknames or abbreviations.
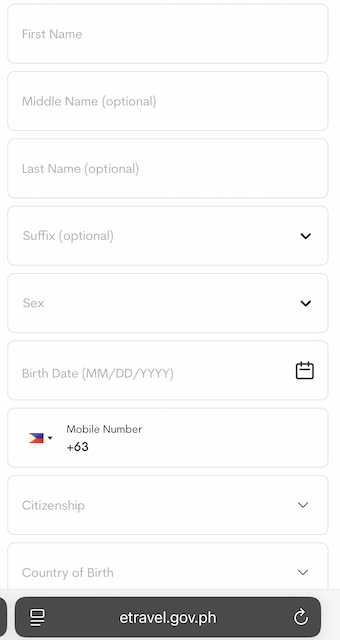
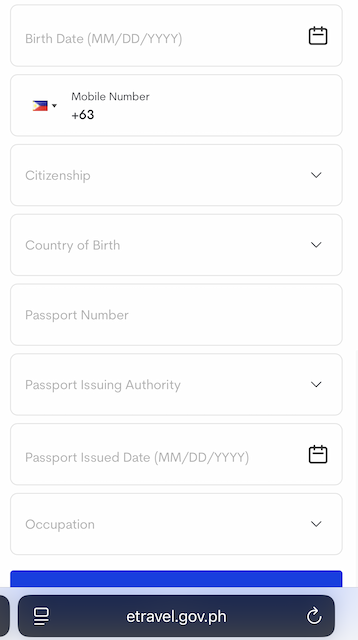
✅ 2. Date of Birth
Use the calendar picker to select your birthdate in the format MM/DD/YYYY (e.g., 05/27/1985).
💡 Double-check the format—some users accidentally switch day and month.
✅ 3. Nationality
Select your nationality from the dropdown list.
If you’re a dual citizen, choose the nationality that matches the passport you are using for this trip.
✅ 4. Passport Number
Enter the passport number exactly as shown on your document.
Be careful with similar-looking characters (e.g., “O” vs “0” or “I” vs “1”).
✳️ Do not include spaces or dashes.

✅ 5. Gender
Select either Male, Female, or Prefer not to say from the dropdown.
Make sure this also matches your passport or government-issued ID when possible.
✅ 6. Contact Number
For contact number:
-
Use your mobile number with country code
(e.g., Japan: +81 90XXXXYYYY / Philippines: +63 9XXXXXXXXX)
🔒 Review Before Proceeding
Before moving to the next step, do a quick final check:
-
✅ Spelling of your name
-
✅ Passport number accuracy
-
✅ Date of birth format
-
✅ Valid contact info
🛃 These details are used by Philippine immigration to validate your arrival.
🟩STEP 3.5: Permanent Country of Residence Registration
Filling in your address and reviewing your personal profile before continuing
Before you begin entering your travel details, the eTravel system will ask you to confirm your Permanent Country of Residence. This step ensures that your personal profile is complete and tied correctly to your travel document.
🏡 Permanent Address Entry
You will see a screen titled:
“Onboarding – Permanent Country of Residence”
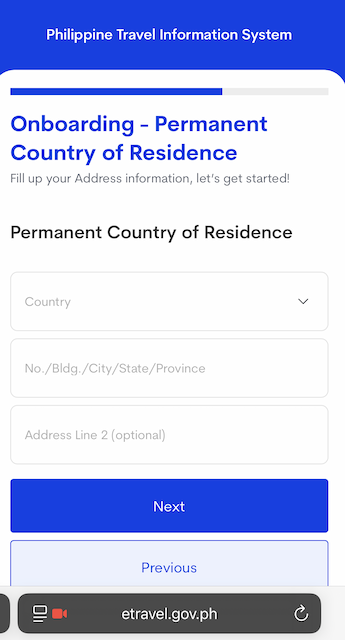
Required Fields:
| Field | Description |
|---|---|
| Country | Select your country of permanent residence from the dropdown list |
| Address Line 1 | Enter full address including building number, city, state/province |
| Address Line 2 | (Optional) Additional details if needed (e.g., apartment number) |
ℹ️ This information is required for immigration processing and statistics.
Click “Next” to proceed.
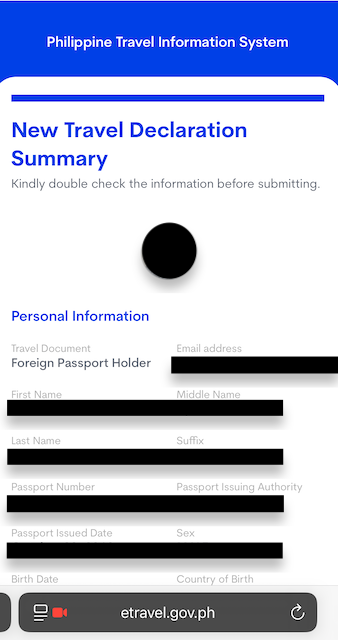
📄 Onboarding Summary
After completing your address, you will be directed to the Onboarding Summary page.
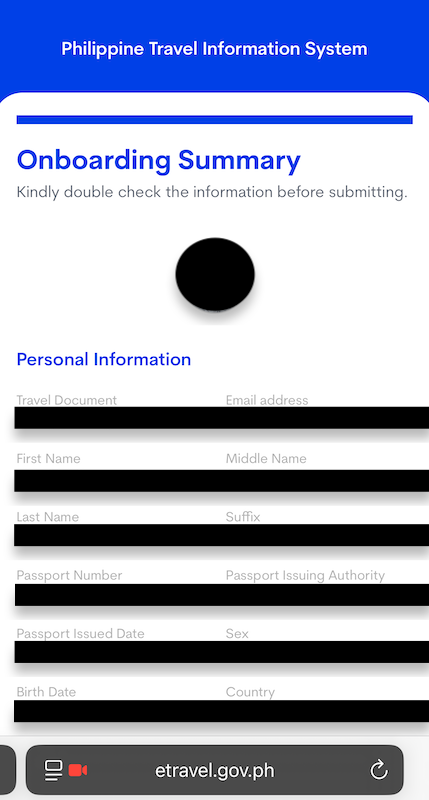

This screen summarizes all personal details you have entered so far:
Personal Information:
- Travel Document Type (e.g., Foreign Passport Holder)
- Full Name (First, Middle, Last, Suffix if applicable)
- Passport Number and Issuing Authority
- Passport Issue Date
- Date of Birth, Sex, Country of Birth
- Country of Residence
- Email Address
- Mobile Number
- Occupation
✅ Carefully review all the data before proceeding. If something is incorrect, click “Previous” to edit.
Once confirmed, click “Next” to move on to:
STEP 4: Travel Details Entry
🟩 STEP 4: Enter Travel Details
In this step, you’ll need to provide essential details about your upcoming trip to the Philippines.
This includes your reason for traveling, flight information, country of departure, and your accommodation in the Philippines.
✈️ Be sure all details match your flight ticket and accommodation documents. Inaccurate entries may cause delays at immigration or boarding.
✅ 1. Purpose of Travel
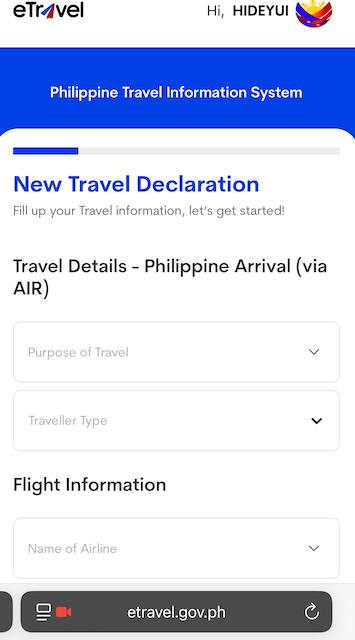
Choose the purpose that best describes your visit:
-
Tourism – For vacation, sightseeing, personal travel
-
Business – Meetings, work trips
-
Returning Resident – Filipino citizens returning home
-
Overseas Filipino Worker (OFW) – If applicable
-
Student – If you are studying in the Philippines (e.g., language school)
-
Others – Any purpose not listed above
🎓 If you are attending an ESL school or university in the Philippines, choose “Student”.
✅ 2. Date of Arrival
Select the exact date of your arrival in the Philippines.
Use the calendar popup and double-check your flight itinerary.
🗓️ Make sure to select the date in Philippine local time.
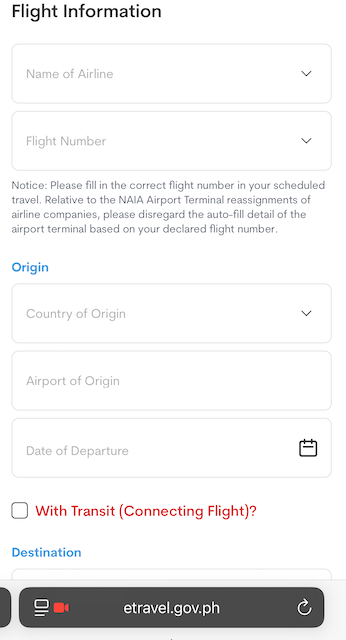
✅ 3. Flight Number
Enter your full flight number exactly as shown on your ticket.
Examples:
-
JL745 (Japan Airlines)
-
PR433 (Philippine Airlines)
-
5J128 (Cebu Pacific)
⚠️ Only enter the alphanumeric flight code. Do not include airline names or special characters.
✅ 4. Country of Origin
Select the country you are flying from directly before entering the Philippines.
-
If flying from Tokyo → Manila → Origin = Japan
-
If transiting (e.g., Doha → Singapore → Manila) → Origin = Singapore
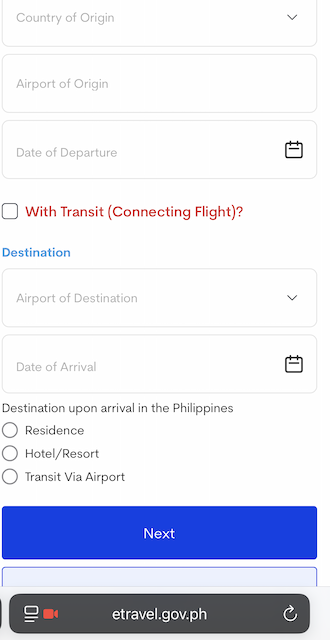
✅ 5. Port of Entry
Choose the international airport you will arrive at:
-
NAIA – Manila
-
Mactan-Cebu International Airport – Cebu
-
Clark International Airport – Pampanga
-
Others (rarely used by international flights)
✈️ If you are studying in Cebu, this will typically be Mactan-Cebu International Airport.
✅ 6. Accommodation Address in the Philippines
You must select the type of accommodation from a dropdown menu. The two most common options:
-
Hotel – If staying in a hotel (for tourists)
-
Residence – For students staying in a school dormitory or long-term accommodation
🏫 For language school students, always select: “Residences”
Then, manually enter the full address of your school dormitory or residence.
Example:
3D ACADEMY
2nd Floor La Nivel Hotel, JY Square Mall, Lahug
Cebu City, Cebu, Philippines
⚠️ Some schools may not appear in the dropdown. Typing the full address is required.
ℹ️ If your school provided a confirmation letter or invoice, copy the address from there.
✅ Before Proceeding
Take a moment to confirm the following:
| Field | What to Check |
|---|---|
| ✅ Purpose of Travel | Is “Student” selected if applicable? |
| ✅ Arrival Date | Matches your actual flight |
| ✅ Flight Number | Format is correct (e.g., PR433) |
| ✅ Country of Origin | Last country before arrival |
| ✅ Port of Entry | Matches your arrival airport |
| ✅ Accommodation | “Residences” selected + accurate school address |
🟩 STEP 5: Complete Health Declaration
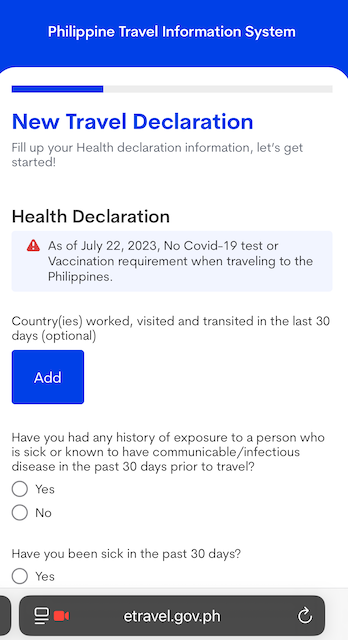
At this stage, you’ll be asked to answer a few simple health-related questions as part of the Philippine government’s public health protocols.
This step helps authorities monitor and prevent the spread of infectious diseases.
✅ Don’t worry—these are straightforward Yes/No questions. Just answer honestly based on your current health status.
✅ 1. Do you currently have any symptoms such as fever, cough, or difficulty breathing?
This question checks for signs of possible illness related to flu, COVID-19, or other respiratory infections.
Examples of symptoms to watch for:
-
Fever
-
Cough
-
Sore throat
-
Body aches
-
Difficulty breathing
-
Loss of taste or smell
❗ If you are experiencing any of these, it is recommended that you delay your travel and seek medical advice.
Answer:
-
No – If you feel healthy and symptom-free
-
Yes – If you’re currently unwell (you may be asked to present medical clearance)
✅ 2. Have you been in close contact with anyone who tested positive for COVID-19 or any infectious disease in the past 7 days?
This refers to direct exposure, such as:
-
Living with or caring for someone who is sick
-
Being within 2 meters for over 15 minutes without a mask
-
Sharing food, transport, or confined space with an infected person
Answer:
-
No – If you have not knowingly been exposed
-
Yes – If you were in close contact with someone who is sick or confirmed positive
ℹ️ A “Yes” answer doesn’t automatically cancel your trip, but authorities may conduct additional checks upon arrival.
✅ 3. (Optional Questions – Depending on Updates)
Sometimes, the system may include additional questions such as:
-
Have you recently traveled to countries with disease outbreaks?
-
Are you fully vaccinated against COVID-19?
🔄 These questions may change depending on government guidelines. Always check the latest version of the form.
🟩 STEP 6: Philippine Customs Declaration
Official 2025 eTravel Guide
As part of the eTravel process, all travelers entering the Philippines must complete the Philippine Customs Declaration section.
This replaces the old paper forms and is now fully digital.
📘 Section 1: Important Customs Information
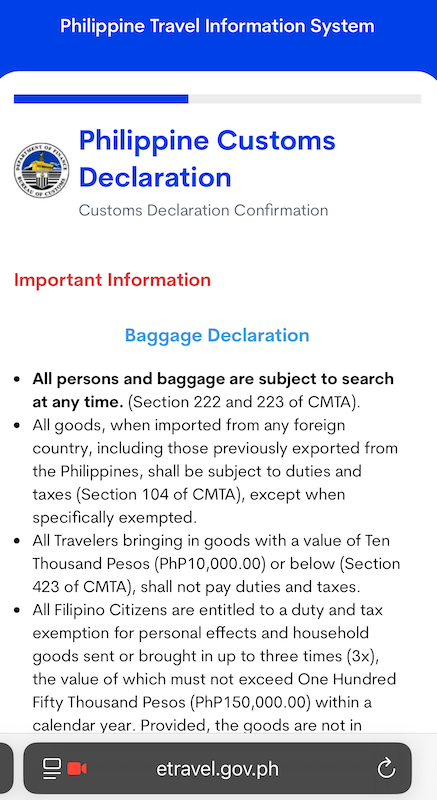
Before answering any questions, you will be shown an information screen that highlights key customs laws:
-
🧳 All persons and baggage are subject to search at any time (Section 222 & 223 of CMTA).
-
📦 All goods imported from abroad are subject to duties and taxes unless exempted (Sec. 104).
-
💰 Travelers may bring in goods worth PHP 10,000 or below without paying taxes (Sec. 423).
-
👨👩👧👦 Filipino citizens may bring in up to PHP 150,000 worth of household goods per year (max 3x) tax-free.
-
🚬 Travelers are allowed up to:
-
2 reams (200 sticks) of cigarettes or 250 grams of tobacco
-
2 bottles of liquor (not exceeding PHP 10,000)
-
⚠️ Failure to declare dutiable goods will result in a 30% surcharge on the total value (Sec. 1404 of CMTA).
🚫 Section 2: Prohibited Goods
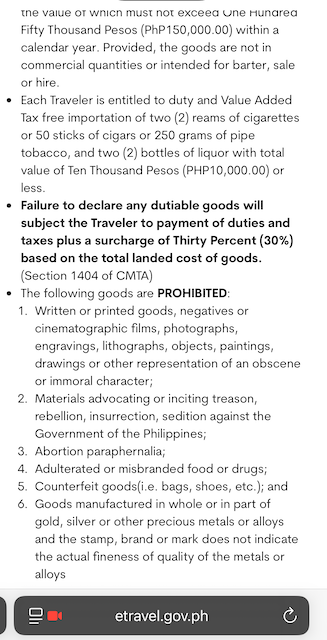
You are strictly prohibited from bringing in the following:
-
Obscene films, photos, literature, or media
-
Materials inciting rebellion or sedition
-
Abortion-related items
-
Fake or adulterated food and drugs
-
Counterfeit goods (shoes, bags, etc.)
-
Gold/silver with fake quality markings
📋 Section 3: What You Must Declare
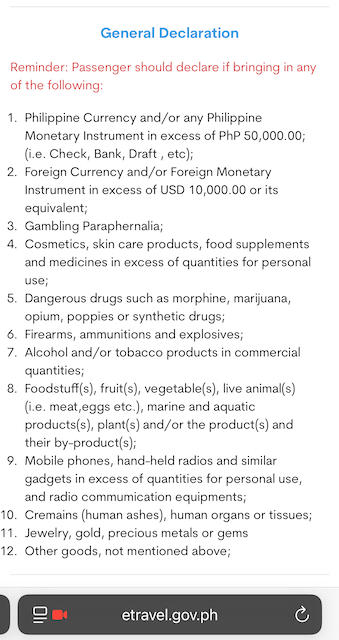
You must declare if you are bringing any of the following:
-
💵 Over PHP 50,000 in Philippine currency
-
💶 Over USD 10,000 in foreign currency or equivalents
-
🎰 Gambling paraphernalia
-
💊 Cosmetics, food supplements, or medicine in commercial quantities
-
☠️ Dangerous drugs (e.g., morphine, marijuana)
-
🔫 Firearms or explosives
-
🍷 Alcohol/tobacco in commercial quantities
-
🥩 Fruits, vegetables, meat, live animals, marine products
-
📱 Electronics (phones, radios, etc.) in excess
-
⚱️ Human remains, body parts, or ashes
-
💍 Jewelry, precious metals/gems
-
🔘 Any other goods not mentioned above
💵 Section 4: Currency Declaration Rules
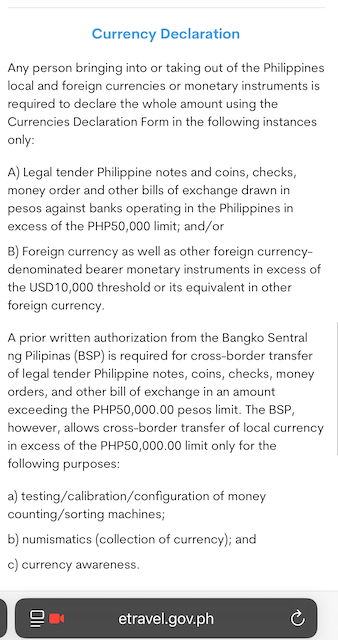
If you are carrying:
-
Over PHP 50,000 in Philippine legal tender (cash, checks, money orders), or
-
Over USD 10,000 in foreign currency,
You must declare it.
✍️ For amounts over PHP 50,000, prior approval from the Bangko Sentral ng Pilipinas (BSP) is required.
Permitted uses for high-value transfers include:
-
Testing money-sorting equipment
-
Currency collection
-
Educational display (currency awareness)
⚖️ Section 5: Legal Warning & Declaration Prompt
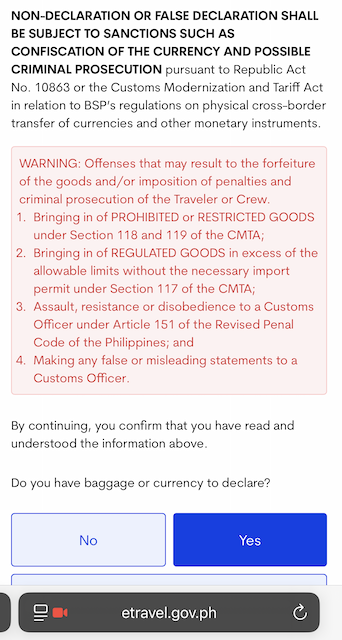
Before you can proceed, you’ll be shown a legal notice:
❗ Non-declaration or false declaration may result in:
Confiscation of items
Criminal charges
Customs penalties and fines
Violations include:
-
Bringing in prohibited/restricted goods
-
Importing regulated goods without a permit
-
Assaulting or disobeying customs officers
-
Providing false or misleading information
🔽 You are then asked:
“Do you have baggage or currency to declare?”
☑️ Yes ☑️ No
Choose based on the items you’re bringing. Answering Yes may require additional details.
✅ Pro Tips
| Scenario | Answer |
|---|---|
| Only clothes, laptop, personal effects | ✅ No |
| Bringing $12,000 in cash | ✅ Yes |
| OFW with items for resale | ✅ Yes |
| Tourist with a drone or luxury bag | ⚠️ Declare if value is high |
🛃 When in doubt — always declare.
🟩 STEP 6.5: Other Travel Details
After completing the customs declaration, you’ll be asked to provide some basic information related to your travel party and baggage.

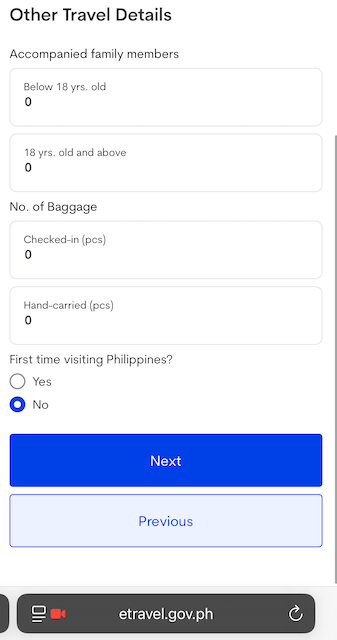
🧑🤝🧑 Accompanied Family Members
| Field | What to Input |
|---|---|
| Below 18 yrs. old | Number of minor children traveling with you |
| 18 yrs. old and above | Number of adult family members traveling with you |
💡 This is for statistical and clearance purposes only.
You’ve already added their details (if applicable) in the Family Member(s) section earlier.
🧳 Number of Baggage
| Field | What to Input |
|---|---|
| Checked-in (pcs) | Number of luggage pieces you’ve checked in at the airline counter |
| Hand-carried (pcs) | Number of carry-on items you’ll bring onboard (e.g., backpacks, small bags) |
🌍 First Time Visiting the Philippines?
Choose:
-
Yes – If this is your first-ever trip to the Philippines
-
No – If you’ve been here before
This information is used for immigration and tourism statistics.
✅ When you’re done
Click the “Next” button to proceed to the final step.
🟩 STEP 6.6: Declaration Signature
(税関申告に対する電子署名)
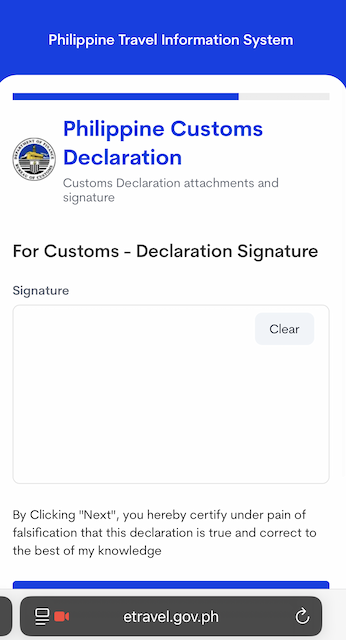
Before finalizing your eTravel registration, you must electronically sign the declaration.
🖊 What You Need to Do
-
Use your finger (on mobile) or mouse/trackpad (on desktop)
-
Draw your signature in the white box
-
Tap “Clear” if you need to reset
-
When done, click “Next”
⚖️ Legal Disclaimer
“By clicking ‘Next’, you hereby certify under pain of falsification that this declaration is true and correct to the best of your knowledge.”
This is your legal attestation that:
-
All customs and health declarations are accurate
-
You are aware of the consequences of false declarations
✅ Summary of These Two Steps
| Step | Purpose |
|---|---|
| STEP 6.5 | Provide final travel details for processing (companions, baggage, first-time flag) |
| STEP 6.6 | Legally confirm all customs information via digital signature |
🟩 STEP 6.7: Family Member(s) Declaration Registration
(eTravel 2025 – Registering Customs & Health Declarations for Dependents)
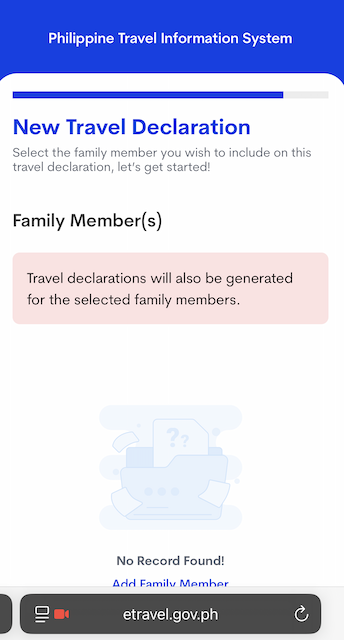
If you are traveling with minor children, elderly parents, or any dependent family members who cannot register for eTravel on their own, this step allows you to include them under your account.
A separate declaration will be automatically generated for each added family member—including customs and health data—bundled into your own submission and QR code.
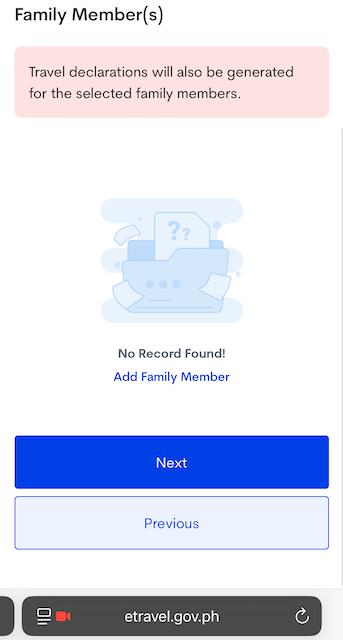
🧩 What You’ll See
You will land on a screen titled:
New Travel Declaration – Family Member(s)
A message will state:
“Travel declarations will also be generated for the selected family members.”
If no family members are listed yet, it will show:
“No Record Found!” with an “Add Family Member” link.
➕ How to Add a Family Member
Click on “Add Family Member” and fill out the following fields:
| Field | Description |
|---|---|
| Full Name | Exactly as shown on the passport |
| Date of Birth | To determine if under or over 18 |
| Nationality | Country of citizenship |
| Relationship | Spouse / Child / Parent / Other |
Once entered, the family member will be added to your declaration group.
👪 Who Should Be Added Here?
Add family members who:
-
Are minors under 18
-
Are elderly, disabled, or unable to register independently
-
Are fully dependent on the primary traveler for entry processing
🔄 Note: Adults capable of registering should still complete their own separate eTravel submission.
📌 Key Notes
-
You are responsible for the customs and health declarations of each added member.
-
Their declarations are included in your QR code.
-
This does not replace immigration requirements (e.g., passport check).
✅ Once Done
-
Click “Next” to proceed with the rest of your registration.
-
If you are not traveling with dependents, simply skip this step and continue.
🟩 STEP 7: Review & Submit
Final Review Before Submission
After completing all the required information—including personal details, travel plans, health declaration, customs declaration, baggage info, and digital signature—you will arrive at the New Travel Declaration Summary screen.
This is your final chance to verify that all information is accurate before submitting your registration.
✅ What to Review on This Page
The summary screen is divided into the following sections:
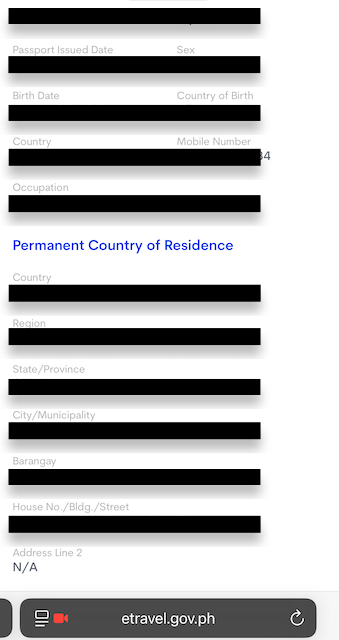
📘 Personal Information
-
Passport type (e.g., Foreign Passport Holder)
-
Full name, birth date, sex
-
Passport number, issuing authority, and issue date
-
Country of birth and residence
-
Email address and mobile number
-
Occupation
-
Complete permanent address (country, province, city, barangay, street)
🛬 Travel Details – Philippine Arrival
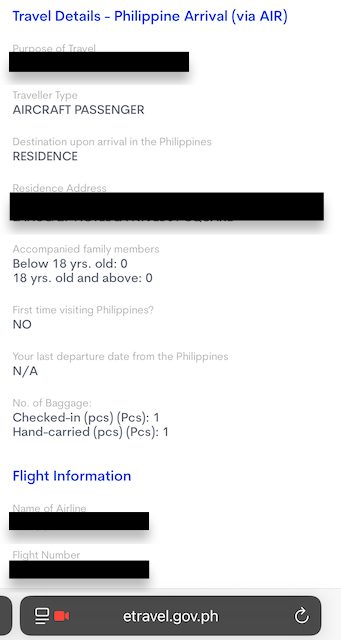
-
Purpose of travel (e.g., Tourism, Business, Returning Resident)
-
Traveler type (e.g., Aircraft Passenger)
-
Address of residence or destination in the Philippines
-
Accompanied family members (under 18 / 18 and over)
-
First time in the Philippines? (Yes/No)
-
Baggage count (checked-in and carry-on)
-
Last departure date from the Philippines (if applicable)
✈️ Flight Information
-
Airline name
-
Flight number
-
Country and airport of origin
-
Transit airport and country (if applicable)
-
Arrival airport in the Philippines (e.g., Mactan–Cebu International Airport)
-
Date of arrival
🩺 Health Declaration
-
Countries visited/transited in the last 30 days
-
Any known exposure to infectious diseases
-
Any symptoms in the past 30 days
📦 Customs Declaration
-
Goods purchased abroad (total value and currency)
-
Currency declarations (PHP 50,000+ or USD 10,000+)
-
Controlled or prohibited goods (e.g., firearms, drugs, food, jewelry, electronics, etc.)
Each item will be marked “Yes” or “No” depending on your response.
✍️ Declaration Signature
-
The digital signature you provided earlier is displayed here for confirmation.
✅ What to Do Before Submitting
-
Carefully review every section for accuracy.
-
Use the “Previous” button to go back and edit if you find any errors.
-
Once everything is correct, click “Submit” to finalize your registration.
✅ What Happens After Submission?
-
Your eTravel QR Code will be generated instantly.
-
You’ll also receive a confirmation email with the QR code.
-
Save the QR on your phone or print it—you must show it at the airport check-in and upon arrival.
🟩 STEP 8: QR Code Issuance & Completion
(Your eTravel Registration is Now Complete)
After clicking “Submit” on the previous review screen, you will arrive at this final confirmation page.

✅ What This Page Confirms
-
Your eTravel registration is successfully completed
-
A QR Code has been generated and linked to your:
-
Health declaration
-
Customs declaration
-
Travel details
-
-
Your Reference Number and Flight Info are displayed
📱 What to Do Now
-
Save the QR Code:
-
📸 Take a screenshot
-
💾 Save the webpage as PDF
-
📩 Check your email for confirmation (from
noreply@etravel.gov.ph)
-
-
Present the QR Code:
-
✈️ At check-in counter before departure
-
🛃 At Immigration upon arrival
-
🧾 At Customs, if required
-
🚫 Optional Status Tags
At the bottom, you may see green buttons like:
-
WITHOUT BAGGAGE DECLARATION -
WITHOUT CURRENCY DECLARATION
This means you declared “No” to both baggage and currency declaration questions.
If you had declared “Yes,” it may reflect differently (e.g., WITH CURRENCY DECLARATION).
✅ Summary
| ✅ You are now travel-ready for the Philippines! |
|---|
| Show this QR Code at all immigration checkpoints |
| Double-check your email for backup copy |
| No need to re-register unless information changes |
🔍 Pro Tip
Create a “Travel” folder in your phone’s photo album to store:
-
Your eTravel QR Code
-
Flight ticket
-
Passport photo page
-
Hotel or school address
This helps speed up immigration and customs procedures.
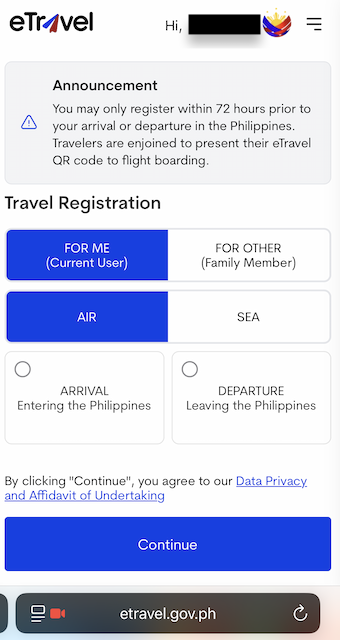
📌 Important Reminders
-
Register within 72 hours before your arrival in the Philippines
-
Make sure all details match your passport and travel documents
-
Have your QR Code ready at immigration and check-in
If you have questions or need assistance, feel free to reach out.
Safe travels and enjoy your time in the Philippines! 🇵🇭✈️
🟦 Frequently Asked Questions (FAQ)
❓ Do I need to register for eTravel even if I’m only transiting through the Philippines?
Yes. All travelers entering or passing through the Philippines must register, even for a short layover, unless they remain airside (do not pass immigration).
❓ How soon can I register before my flight?
You can register on https://etravel.gov.ph within 72 hours (3 days) before your scheduled arrival or departure from the Philippines.
📅 For example, if your flight arrives on July 10 at 10:00 AM, you can register anytime from July 7 at 10:00 AM onward.
❓ Is the eTravel registration free?
Yes, it’s completely free.
Avoid scam websites that ask for payment or credit card details. The only official site is:
👉 https://etravel.gov.ph
❓ I’m traveling with my children. Do they need a separate registration?
It depends.
-
✅ Minors under 12 years old may be added as accompanying family members in a parent’s eTravel form.
-
🔄 Teenagers and adults must register separately.
Always list dependents accurately in the “Family Accompanying” section.
❓ What if I lose my QR code?
You can log back in at any time at https://etravel.gov.ph and re-download or view your QR code.
You can also check your email inbox for the confirmation message.
❓ Can I update my information after submission?
No, you cannot edit submitted information.
However, you can cancel the current registration and start a new one, as long as it’s still within the 72-hour window.
❓ What if I experience symptoms (fever, cough) before my flight?
If you feel unwell, especially with COVID-like symptoms, it’s best to delay your travel and consult a medical professional.
Falsifying health information on eTravel can result in denial of entry or penalties.
❓ Do I still need to fill out a customs form at the airport?
No.
The Customs Declaration is now part of your eTravel registration.
Your QR code includes both health and customs information, so no paper form is needed.
❓ I made a mistake in my flight number or address. What should I do?
Unfortunately, you cannot edit submitted details. The best option is to re-register from scratch using the correct information, as long as you’re within the 72-hour period.
❓ Is internet access required to show the QR code at the airport?
No. You can screenshot or print your QR code in advance.
You don’t need an internet connection to show it at immigration or check-in.
🟩 Summary: What You Need to Remember
Before traveling to the Philippines in 2025, completing your eTravel registration is not just recommended—it’s required.
Here’s a final recap to ensure a smooth journey:
✅ Key Takeaways
-
🖥️ Register online at https://etravel.gov.ph within 72 hours before arrival or departure
-
🛂 Registration includes:
-
Personal & travel information
-
Health declaration
-
Customs declaration
-
-
👨👩👧 Family members (such as minor children or elderly dependents) can be added as accompanying persons in your form
-
🧾 No paper customs forms are required—everything is integrated into your eTravel QR Code
-
📲 QR Code is mandatory at check-in and immigration.
Save it digitally or print a copy for backup
⚠️ Final Reminders
-
✅ Use only the official site: https://etravel.gov.ph
→ Never pay any registration fee -
⚠️ Double-check flight number, passport info, and accommodation address
-
🚫 You cannot edit submitted info—cancel and re-register if needed
-
🛃 Be honest in your health and customs declarations to avoid delays or penalties
✈️ Safe Travels to the Philippines!
By following this step-by-step guide, you’ll arrive well-prepared, save time at the airport, and avoid any last-minute stress.
If you’re studying, vacationing, or visiting loved ones—welcome, and enjoy your stay in the Philippines! 🇵🇭


![Beyond Chocolate Hills and Tarsiers: Your Complete Guide to Exploring Bohol Island [2025 Edition]](https://studyenglishdirect.com/wp-content/uploads/2025/05/DSCF7150-e1489128665883-768x576.jpg)